
Backgammon Rules: The Complete Guide
Everything you need to play real backgammon, in one page. The diagrams below are drawn in the same colors as our board, so what you learn here looks exactly like what you will play.
Last updated:
The Board and Starting Setup
A backgammon board has 24 narrow triangles called points, split into four quadrants of six. Each player commands 15 checkers. The points are numbered 1 to 24, and the two players move in opposite directions along a horseshoe path: on our board, White travels from point 24 down toward point 1, and Black travels from point 1 up toward point 24. Points 1 to 6 are White's home board; points 19 to 24 are Black's. The raised strip in the middle is the bar, and it matters more than it looks.
Both players start with the same arrangement: two checkers on the opponent's farthest point, five in the opponent's outer board, three in their own outer board, and five on their six point. It looks scattered at first; in play it makes immediate sense, because every group has a job. The two far checkers (the back checkers) have the longest journey, and what to do with them is half of backgammon strategy.
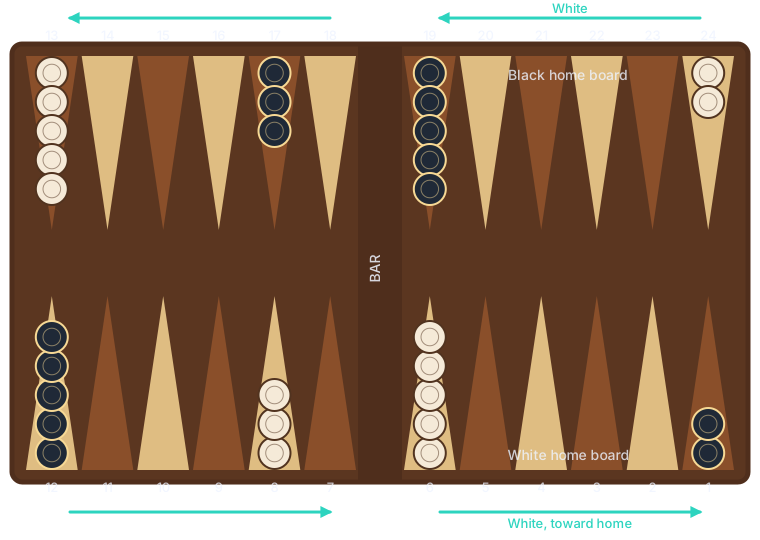
The goal: bring all 15 of your checkers around into your home board, then bear them off (remove them from the board). First player to bear off all 15 wins.
Rolling and Moving
On your turn you roll two dice, and each die is a separate move. Roll a 3 and a 5 and you may move one checker 3 points and another checker 5, or move the same checker twice (3 then 5, or 5 then 3), as long as each step lands legally. A checker may land on any point that is empty, occupied by your own checkers, or occupied by exactly one enemy checker. A point holding two or more enemy checkers is blocked: you cannot touch it, not even passing through on a combined move, because each die is its own hop.
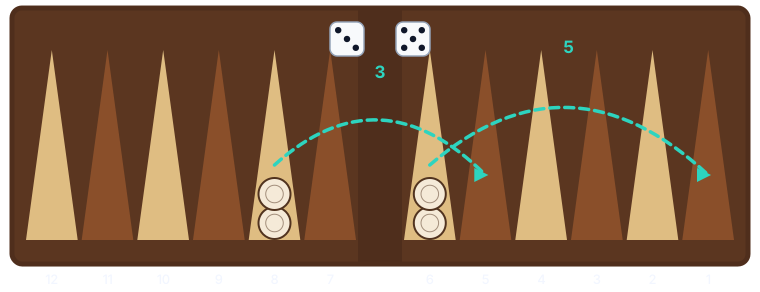
Doubles are a gift. Roll the same number on both dice and you play it four times, not twice. Double 6s means four moves of 6, which can transform a position in a single turn.
You cannot pass, and the dice are not optional. If both dice can be played, both must be played. If only one can be played, you must play it. And if you could legally play either die but not both, you are required to play the higher one. When no legal move exists at all, your turn simply passes. Our board enforces all of this automatically, which is also a painless way to learn it.
Hitting and the Bar
A point holding exactly one checker is called a blot, and a blot is a target. If an enemy checker lands on it, the blot is hit: it is picked up off the board entirely and placed on the bar, the strip in the middle. Getting hit late in the game is one of the most painful swings in backgammon, because that checker must restart its journey from the very beginning.
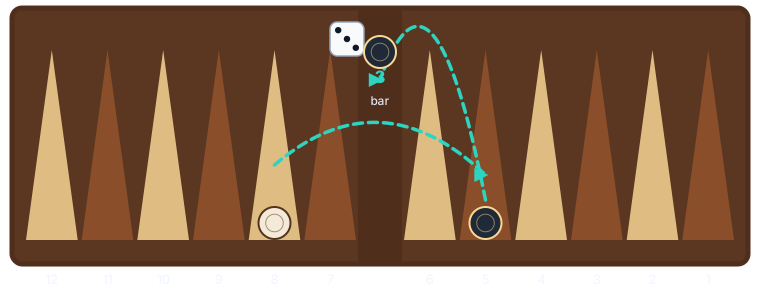
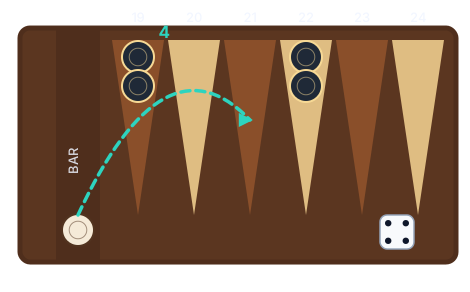
While you have a checker on the bar, the rest of your army is frozen. You may make no other move until every checker of yours on the bar has re-entered. Re-entry happens in your opponent's home board, on the point matching your die counted from your starting edge: for White, a die of 4 enters on point 21 (25 minus 4); for Black, a die of 4 enters on point 4. If the entry points shown by both dice are blocked by enemy checkers, your whole turn is lost, and against a strong home board that can happen several turns in a row.
Bearing Off
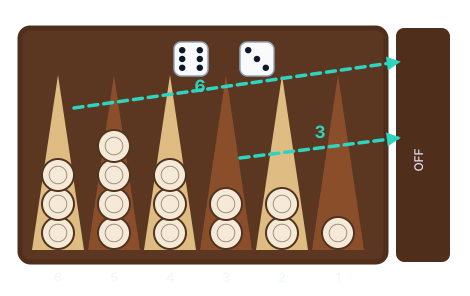
Once all 15 of your checkers have reached your home board, the endgame begins: bearing off. An exact roll bears a checker off from the matching point: a 5 removes a checker from your 5 point. If you roll a number higher than your highest occupied point, you may bear off from your farthest occupied point instead, so nothing is ever wasted at the end. And you always have the option to move a checker within your home board rather than bear off, which sometimes matters for safety.
One important catch: if you get hit during the bear-off and end up on the bar, you must re-enter and bring that checker all the way home again before you may continue bearing off. This is why a careless bear-off against a waiting enemy anchor can still lose a won game.
Three Ways to Win
The first player to bear off all 15 checkers wins, but backgammon grades the size of the victory:
- Normal win: your opponent has borne off at least one checker. Worth 1 point on our leaderboard.
- Gammon: your opponent has borne off nothing at all. Worth 2 points. This is why a player who falls far behind should still race checkers home rather than give up; saving the gammon is a real goal.
- Backgammon: the heaviest defeat. Your opponent has borne off nothing AND still has a checker on the bar or inside your home board. Worth 3 points.
When you beat our AI, the leaderboard score is also scaled by the difficulty: level 3 gives full points, lower levels give less (a third at level 1, two thirds at level 2), and higher levels give more (4/3 at level 4, 5/3 at level 5). Beating a stronger opponent is simply worth more.
A note for players coming from club play: traditional money backgammon also uses a doubling cube, a die marked 2 to 64 that raises the stakes mid-game. Our version does not use the cube; every game is played to its natural finish, and the win type alone decides the points. The checker play you learn here transfers completely.
Try the Rules on a Real Board
Rules become reflexes only through play. Open our board, set the AI to level 1 or 2, and play a few casual games. Every legal destination lights up when you pick up a checker, bar entry and bearing off are enforced exactly as described above, and you can click any move in the history to step back and see how the position looked before it. Two or three games and the bar will never confuse you again.