Backgammon Strategy: Risk, Structure, and the Race
The dice decide each roll; you decide everything else. This page teaches the decisions: when to run, when to block, when to hit, and when a "safe" play is actually the losing one.
Last updated:
The One Idea Everything Hangs On
Backgammon is a race that you are sometimes allowed to interrupt. Whoever gets 15 checkers home and off the board first wins, so in the simplest possible game you would both sprint and the dice would decide. What makes backgammon a real game is contact: as long as opposing checkers can still reach each other, hitting, blocking, and timing matter more than raw speed.
So before every nontrivial decision, ask one question: am I winning the race, or losing it? Winning the race, simplify: avoid contact, break away, and run. Losing the race, do the opposite: keep contact alive, hold strong points, and play for a shot. Most beginner mistakes are race mistakes in disguise: racing when behind, or picking fights when ahead.
When we taught our AI to play, this was the core of it: evaluating every legal dice sequence and weighing race position against structure and risk. The levels differ in how deeply they weigh it, which is why level 1 plays loose and hopeful while level 5 punishes every careless blot.
Backgammon Phrases and Terms: Speak the Language First
Backgammon has 5,000 years of vocabulary behind it, and strategy talk uses it constantly. Skim these now and the rest of the page reads easily.
One note before the list: these are quick definitions, not full lessons. The rules terms are explained step by step, with diagrams, in our rules guide, and the key structures are drawn out further down this very page. Think of this section as the phrasebook, not the textbook.
Board and Rules Terms
- Checker: one of the 15 round playing pieces each player commands. Also called stones, men, or counters; the game's very name comes from them. Everything in backgammon is about marching your checkers home.
- Point: one of the 24 triangles on the board.
- Made point: a point holding two or more of your checkers. The opponent cannot land there.
- Blot: a lone checker on a point. It can be hit.
- Hit: landing on an enemy blot and sending it to the bar.
- Bar: the central strip where hit checkers wait. A checker on the bar must re-enter before anything else may move.
- Home board (inner board): the final six points of your route, where you bear off. The opponent's hit checkers re-enter in YOUR home board, which is why making points there is so valuable.
- Outer board: the six points just outside each home board.
- Bearing off: removing checkers from the board once all fifteen are home. First to remove all fifteen wins.
- Doubles: the same number on both dice, played four times.
- Gammon / backgammon: the upgraded wins, worth 2 and 3 points: the loser bore off nothing, and for a backgammon also has a checker on the bar or in the winner's home board.
Strategy Terms
- Pip count: the total number of dice pips you still need to bring every checker home and off. The fundamental measure of who is winning the race.
- Builder: a spare checker positioned to help make a new point next turn.
- Prime: a wall of consecutive made points. Six in a row is a full prime, and nothing gets past it.
- Anchor: a made point inside the opponent's home board. A safe harbor for your back checkers and insurance against being closed out.
- Golden point: the 5 point in your home board, widely considered the most valuable point on the board. Its mirror in the opponent's board (their 5 point, your 20 point as White) is the golden anchor.
- Direct shot: a blot within 6 pips of an enemy checker, hittable with a single die.
- Running game: the plan of breaking contact and racing home when ahead in the pip count.
- Holding game: keeping an anchor or point on the opponent's route and waiting for a shot while they try to come home.
- Blitz: an all-out attack that hits everything in sight and races to close the home board before the opponent recovers.
- Back game: the desperation plan: holding two or more anchors deep in the opponent's home board, staying far behind on purpose, and winning with a late shot.
- Closeout: all six of your home board points made while an enemy checker sits on the bar. They cannot enter at all until you break a point.
Hear a term we missed? Send it through the contact page and we will add it.
Count the Race: The Pip Count
The pip count is backgammon's scoreboard. Each checker's distance from being borne off, summed over all fifteen, is your count; at the start both players stand at 167. Lower is better. You do not need to compute it exactly on every turn; what you need is the habit of asking who is ahead and by roughly how much.
The count picks your plan. Ahead by a meaningful margin (say 10 percent or more), you want a running game: break contact, avoid fights, and let the lead carry you home. Behind by that much, racing is exactly wrong; you need contact, anchors, and the patience to wait for a shot. Close counts mean flexible play. The single most common improving-player mistake is playing the position they wish they had instead of the one the count says they have.
Blots and Shots: Managing Risk
Every blot is a bet, and the odds are countable. A blot within direct range (6 or less) of an enemy checker can be hit by a single die, and the closer it is, the more dice combinations hit it. A blot 6 away can be hit by 17 of the 36 possible rolls; a blot 1 away by only 11. Indirect shots (7 to 12 away, needing both dice) are far less dangerous, around 2 to 6 rolls each.
Two practical habits follow. First, when you must leave a blot, prefer to leave it far from enemy checkers or behind their army entirely, where fewer or no numbers reach it. Second, weigh what a hit would cost: a blot hit in your opponent's home board barely loses ground, while a blot hit when your opponent's home board is strong can bury you on the bar. The question is never "can I be hit?" but "how likely, and how bad?"
And do not let fear flip into paralysis. Safe plays that bury checkers on dead points lose slowly but surely. Strong players leave blots constantly; they just leave the right ones.
Structure: Points, Primes, and Anchors
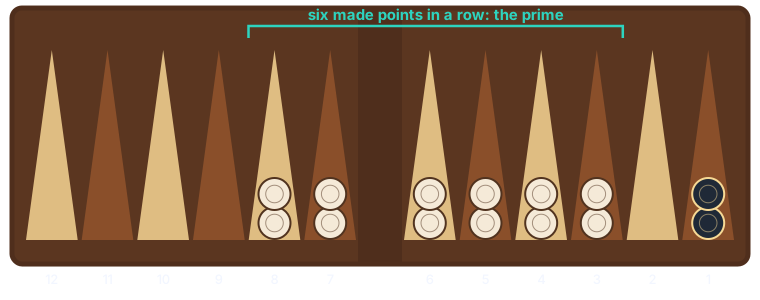
Made points are the bones of a position. Each consecutive made point in front of an enemy checker robs it of landing squares, and six in a row is a full prime: a wall that no checker behind it can pass, because no die is bigger than 6. Even four or five consecutive points form a fearsome fence. Building toward a prime in front of your opponent's back checkers, while they still sit there, is one of the most powerful plans in the game.
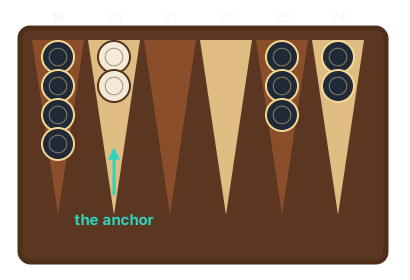
The defensive mirror of the prime is the anchor: a made point inside the opponent's home board. An anchor gives your back checkers a safe harbor that cannot be hit or attacked, guarantees you a re-entry point if you are hit, and stands directly on your opponent's path home, threatening a shot for as long as you hold it. The best anchors are the advanced ones, especially the golden anchor on the opponent's 5 point.
Priority-wise, the points nearest your 5 and 4 points are gold, the bar point (7) is excellent, and deep points in your home board (1 and 2) are the least valuable to make early, because checkers there are finished moving and do no more work.
The Four Game Plans
Almost every backgammon game settles into one of four shapes. Recognizing which one you are in, and which one the dice are offering, is the real skill.
- The running game: you lead the race, so you disengage and sprint. Break contact cleanly, avoid leaving shots during the getaway, and turn the game into pure speed.
- The holding game: you trail the race but hold a strong anchor or point on their route. You wait. Sooner or later their bear-in forces a blot within range, and one hit reverses the race entirely.
- The blitz: the opponent has a blot-heavy position and you have ammunition at home. Hit everything, make home board points on their head, and try to close them out before they ever recover. High risk, devastating when it works.
- The back game: already far behind, you deliberately keep two anchors deep in their home board and play for one late, game-winning shot during their bear-off. A genuine plan, but a last resort; timing it is an art.
The plans are not fixed for the whole game. A holding game becomes a running game the moment your shot lands. Re-read the position after every exchange of hits.
Bearing Off Without Disasters
With no contact left, bearing off is pure technique: take checkers off with both dice whenever you can, and keep your remaining checkers spread rather than stacked on one or two points so future rolls stay efficient.
With an enemy anchor still in your home board, everything changes. Every roll that forces a blot within range of that anchor can hand the game away at the finish line. Bear in with checkers placed evenly, avoid leaving a lone checker on a high point, and when the dice force a risk, leave the shot that the fewest numbers hit. Games are lost in the last five rolls more often than new players believe.
Training With Our AI
The five levels are tuned for this journey. Levels 1 and 2 play fast and loose: they leave blots they should not and miss hits they should take, which is exactly what you need while the movement rules become reflexes. Level 3 plays a sound, club-level game. Levels 4 and 5 evaluate dice sequences deeply and will make you pay for stacked points, careless blots, and racing from behind.
Two features are worth using deliberately. The move history lets you click back through a finished game; when a loss feels like bad dice, replay it and find the roll where the plan went wrong, because there usually is one. And the leaderboard multiplier rewards courage: beating level 5 earns two thirds more than beating level 3.