
Sartaba Dominion Rules, The Complete Guide
Everything you need to command your first army, in one page. The diagrams below are drawn in the same neon colors as our board, so what you learn here looks exactly like what you will play.
Last updated:
The Board and the Armies
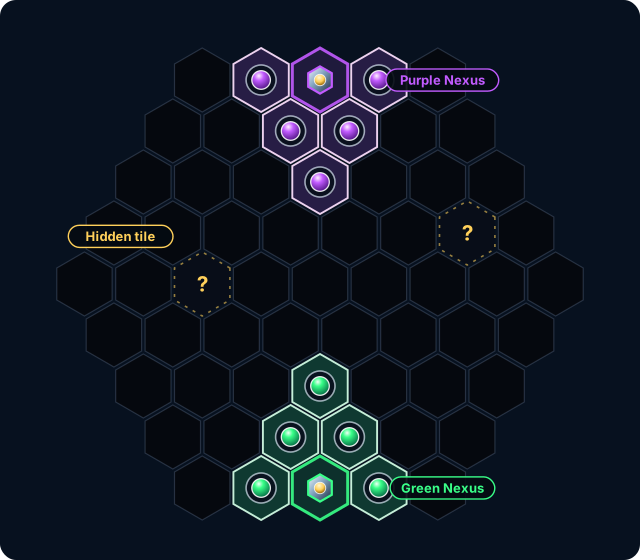
Dominion is played on a hexagonal map of 61 tiles. Each player commands five pawns and one Nexus Fortress. The Nexus sits at the back of your side and never moves. It is a structure, not a pawn, so it cannot attack and it cannot be pushed. Your five pawns begin arrayed in front of it, ready to spread out across the map.
Two tiles somewhere in the middle band of the board start face down. Both hide a Flag, a golden objective that becomes a powerful forward stronghold for whoever captures it. Their exact positions change every game, so no two battles open the same way.
Green always moves first, and turns alternate from there. On the site you can take either side against the AI or a friend.
Taking a Turn
On your turn you move one pawn to one adjacent hex. That is the whole action. There is no dice roll, no card draw, and no multi-hex sprint. A pawn may step onto a neutral tile, onto a tile you already control, or onto a tile the enemy controls. It cannot land on a tile occupied by a friendly pawn, and it cannot jump over anything.
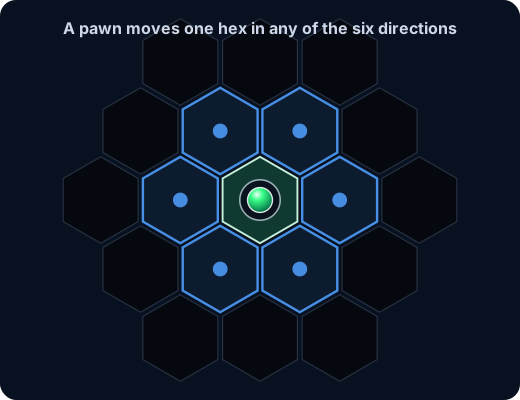
On our board, clicking one of your pawns lights up every legal destination, including special actions such as linking to a Flag or attacking the Nexus, so you never have to guess what a pawn can do.
Territory and Influence
Every tile a pawn stands on or has passed through belongs to that pawn's player. When your pawn moves on, the tile stays yours. It keeps its color, counts toward your territory, and carries your supply. Controlled tiles do not fight, though. Only pawns attack, and a controlled tile changes hands the moment an enemy pawn steps onto it.
Encirclement matters in Dominion. A neutral tile completely surrounded by one player's tiles joins that player. A pocket of enemy tiles whose entire border belongs to you flips to your color. And a pawn whose every neighboring hex is occupied by enemy pawns is eliminated on the spot, no push required. Surround your opponent and the map itself starts working for you.
Pawn Strength
Every pawn carries a Strength value, shown on our board as a colored bar on its left side with the exact number beneath. All pawns start at 1.0 and grow by conquering ground.
- Capturing a neutral tile adds 0.10 Strength, permanently.
- Capturing an enemy tile adds 0.50 Strength, permanently.
- Permanent Strength is capped at 4.0.
- A pawn also earns a distance bonus of 0.4 for every hex beyond adjacent that separates it from your nearest Nexus or captured Flag, up to 3.0 extra. The bonus is recalculated every turn, shrinks as the pawn retreats homeward, and vanishes the instant the pawn is cut off from supply.
The bar's color reads at a glance. Red means Strength below 1.0, a pawn in danger. Yellow covers the normal range up to 2.5. Green means above 2.5, a veteran strong enough to push most enemies alone. Two more facts complete the system. A pawn that is disconnected from supply cannot gain Strength at all, and lost Strength is never refunded. The moment a pawn's Strength reaches zero, it is eliminated.
Pushing Enemy Pawns
Pawns are never captured by simply landing on them. Instead, you push. Moving into an enemy pawn shoves it one hex directly away from you, and the shove costs the defender 0.33 Strength. To push at all, your combined attack Strength must reach at least one and a half times the defender's Strength.
Combined is the key word. The attacking pawn brings its own Strength, and every friendly pawn that is adjacent to both the attacker and the defender adds its Strength to the total. A strong veteran can push a weak pawn alone, while two ordinary pawns working side by side can push a defender neither could move by itself. A pawn that is cut off from supply contributes nothing and cannot lead an attack.
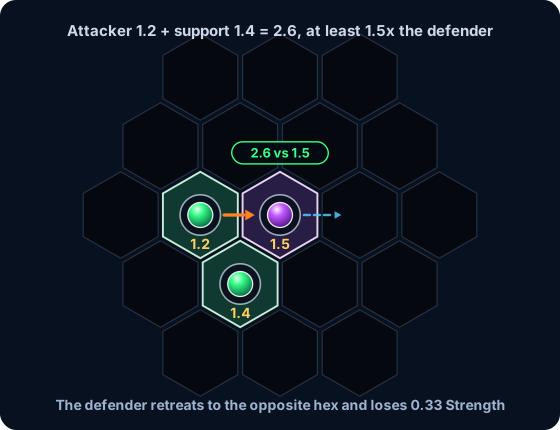
When you select a pawn, our board draws green arrows toward every enemy you can push, with the combined attack Strength displayed beside them, and red dashed arrows toward enemies you are not yet strong enough to move.
The retreat can be fatal. A pushed pawn is eliminated instead of retreating when the hex behind it is off the board, occupied, or blocked by a Nexus, a Flag, or an active objective tile. It is also eliminated if the shove drives its Strength to zero. Pinning enemies against the board edge or against your own pieces turns an ordinary push into a kill.
Supply Lines
This is the rule that makes Dominion feel like a war and not a skirmish. A pawn is supplied while an unbroken chain of your own tiles connects it back to a supply anchor, meaning your Nexus or any Flag you have captured. Break that chain and the pawn is disconnected. A disconnected pawn loses 0.5 Strength every full round, loses its entire distance bonus at once, cannot push, cannot gain Strength, and if its Strength drains to zero it dies where it stands.
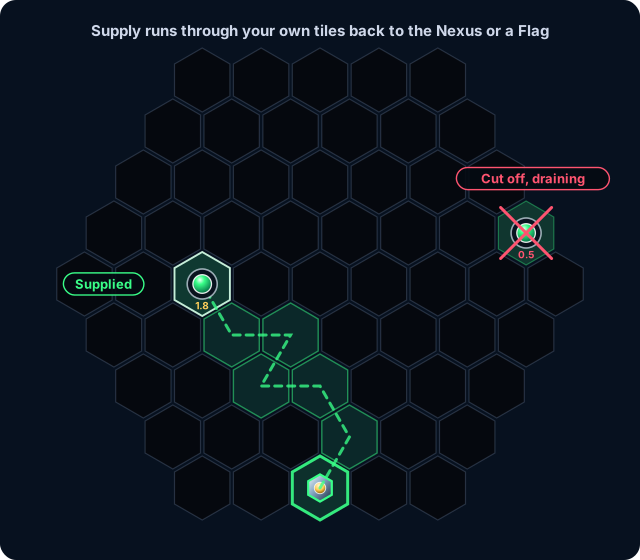
Reconnecting stops the drain but restores nothing. Strength only ever comes back through new conquest. And when a pawn dies, any territory that was connected to your anchors only through that pawn's tiles collapses back to neutral immediately, which can disconnect further pawns in a chain reaction. Our board draws each pawn's supply route as a dotted line so you always see what hangs by a thread.
Flags, the Hidden Objectives
The two hidden tiles are Flags, and pawns never step onto them. Instead, move a pawn adjacent to a hidden tile and spend a turn linking to it. The link reveals the Flag and begins stabilization. While linked, that pawn cannot be pushed by ordinary attacks, but it is committed. Moving it breaks the link and resets all progress.
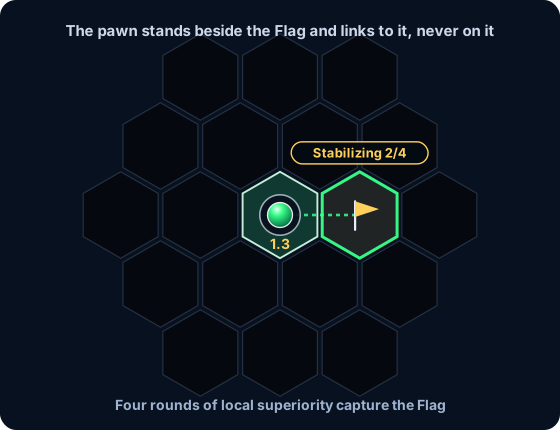
Stabilizing takes four rounds in which you keep strict local superiority, meaning more supplied pawns adjacent to the objective than your opponent has. If the adjacent forces become equal, the objective turns contested and progress resets to zero. A captured Flag becomes yours in full. It anchors supply exactly like a second Nexus, which is what makes deep offensives sustainable.
Captured Flags can be taken back. If your opponent ever holds more adjacent pawns around your Flag than you do, a recapture clock starts, and four rounds of sustained superiority flip the Flag to them. A Flag whose every neighboring hex is occupied by enemy pawns changes hands instantly.
The Nexus Siege and Winning
There are exactly two ways to win. Eliminate every enemy pawn, or capture the enemy Nexus. There is no draw in Dominion. Every game ends with a conqueror.
The Nexus cannot be pushed or occupied, so it falls only to siege. To attack it you need local superiority, more supplied pawns adjacent to the Nexus than the defender has. With superiority established, a pawn next to the Nexus spends its turn attacking, and each round of maintained pressure advances the siege. Five successful rounds capture the fortress and end the game on the spot.
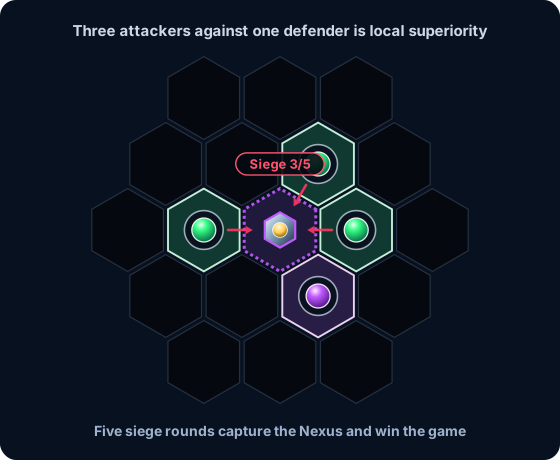
The defense is straightforward and brutal. The moment the defender matches or outnumbers the attackers around the Nexus, the entire siege progress resets to zero. Merely standing next to the enemy Nexus achieves nothing. You must spend turns attacking, and you must hold the perimeter while you do it.
Try the Rules on a Real Board
Dominion's rules interlock, and the interlocking is much easier to feel than to memorize. Open our board, set the AI to level 1 or 2, and play a few casual games. Legal moves light up when you select a pawn, push arrows show attack strength before you commit, supply routes are drawn for you, and every objective displays its progress. Two or three games and the whole system will feel natural.