
Dominion Strategy, From Supply Lines to Siege
The rules of Dominion tell you what a pawn can do. This page is about what a pawn should do. It is written from the games we played and lost while designing the thing, so every idea here has been paid for.
Last updated:
The One Idea Everything Hangs On
Dominion is a war of connection. Your pawns are only as strong as the trail of tiles behind them, and your opponent's army is only as dangerous as its own trail. Every strong plan in this game either strengthens your connections or attacks theirs. Expansion earns Strength, but expansion that outruns its supply is a loan the map will collect on.
So before every move, ask two questions. If this pawn advances, what happens to the line behind it? And is there a move that hurts my opponent's line instead? A cut corridor does more damage than any push, because a push costs one pawn 0.33 Strength while a cut bleeds every pawn beyond it, every round, until something dies.
When we tuned the AI, the biggest jumps in playing strength came from exactly this. The lower levels chase tiles and pushes. The higher levels watch corridors, and it makes them feel like entirely different opponents.
Dominion Phrases and Terms, Speak the Language First
Dominion is our own game, so its vocabulary is too. These quick definitions make the rest of the page read easily. The mechanics behind them are explained step by step, with diagrams, in our rules guide.
Board and Rules Terms
- Pawn. Your only unit. You have five, they never respawn, and losing all of them loses the game.
- Nexus. Your home fortress. It anchors your supply and its capture ends the game. It cannot move, attack, or be pushed.
- Flag. A hidden golden objective. Once captured it anchors supply exactly like a second Nexus.
- Strength. A pawn's fighting value. It starts at 1.0, grows through conquest, drains when the pawn is cut off, and never comes back once lost.
- Distance bonus. Extra Strength a supplied pawn earns for operating far from its anchors, up to 3.0. It disappears the moment the pawn disconnects.
- Push. The attack. Your combined Strength must reach one and a half times the defender's, and the defender retreats one hex away from you.
- Support. A friendly pawn adjacent to both your attacker and the defender. Its Strength counts toward the push.
- Stabilizing. The four-round process of capturing a revealed Flag by holding more adjacent pawns than your opponent.
- Siege. The five-round process of capturing the enemy Nexus through local superiority. Defense at any point resets it.
Strategy Terms
- Supply line. The chain of your own tiles connecting a pawn to a Nexus or captured Flag. The single most important shape on the board.
- Corridor. A narrow supply line, sometimes one tile wide. Fast to build and fatally easy to cut.
- Cut. Occupying a tile of the enemy's supply line so everything beyond it disconnects and starts draining.
- Spearhead. A pawn or pair pushed deep into enemy territory, earning the distance bonus and threatening Flags and the Nexus.
- Encirclement. Surrounding tiles, groups, or pawns so the map flips them to you. A fully surrounded pawn dies instantly.
- Anchor. Any supply source, your Nexus or a captured Flag. More anchors mean shorter, safer lines.
- Compression. Pushing an enemy pawn toward the board edge or against other pieces until it has no retreat hex and dies.
Hear a term we missed? Send it through the contact page and we will add it.
Attack in Pairs
The one and a half times rule has a simple consequence that decides most early fights. Two fresh pawns cannot push each other, because 1.0 against 1.0 falls short of the threshold. A pair of pawns standing together, both adjacent to the same enemy, can. Combined they bring 2.0 or more against a defender who needs to survive 1.5. Almost every attack in Dominion is really a geometry problem, and the answer is usually two pawns forming a wedge.
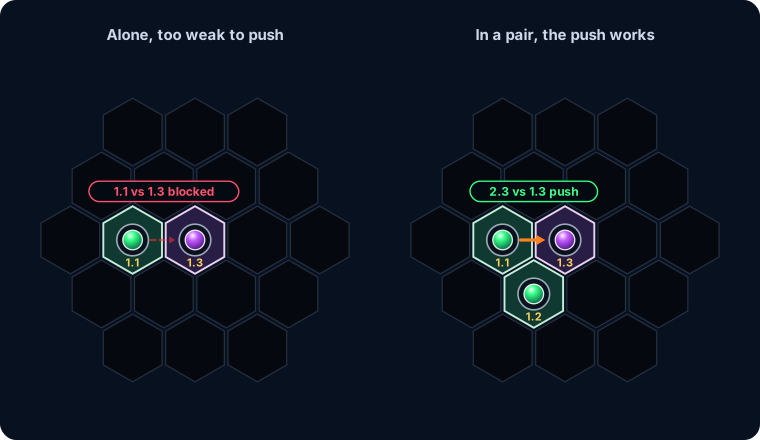
The support must be adjacent to both the attacker and the defender, so the wedge shape matters more than the raw count. Practice reading it on the board. When you select a pawn, the green and red arrows are showing you exactly this arithmetic, and after a few games you will see the wedges before you count anything.
Pairs defend as well as they attack. Two pawns together are far harder to push, they cover each other's retreat hexes, and they stabilize objectives against a lone harasser. Moving your army as loose pairs rather than scattered singles is the single fastest upgrade a new player can make.
Keep Your Supply Line Protected
Your supply line is your true body, and the pawns are only its hands. A line one tile wide invites a single enemy pawn to step on it and disconnect everything beyond. Where you can afford it, walk your pawns along parallel paths so the territory behind them is two tiles thick. A double-width line cannot be cut by one move, which means you always get a turn to respond.
Watch the dotted supply routes our board draws for each pawn. If two of your pawns share one long thread, that thread is your whole flank. Guard the pinch points, the narrow places where one enemy step would sever it, and when your opponent's pawns start drifting toward one, believe them.
Cut the Enemy Corridor
Everything above cuts both ways, and the attacking version is the strongest move in the game. One pawn placed on the right tile can disconnect an entire enemy spearhead. The stranded pawns lose their distance bonus at once, drain 0.5 Strength per round, cannot push, and must waste turns crawling home or die where they stand. You gain tempo, territory, and usually a kill, all for one move.
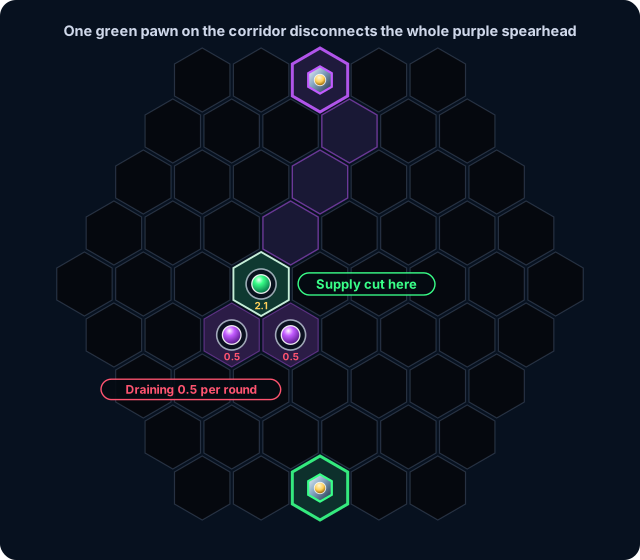
Look for enemy corridors that stretch one tile wide, and remember that capturing an enemy tile pays 0.50 Strength on top of the strategic damage. The cut is how material advantages are actually created in Dominion. Direct pushes trade blows, but a good cut wins pawns without a fight.
Go For the Far Flags
The Flags are placed in the middle band of the map, and the fight for them is the midgame. Reaching them early matters for three reasons. A captured Flag is a second anchor, which shortens every future supply line on that side of the board. The march toward one earns the distance bonus, so the pawns doing it arrive stronger than they left. And every Flag you hold is one your opponent must besiege for four rounds to take back.
Send a pair, not a loner. Stabilization needs local superiority, and a single linked pawn is an invitation for one enemy pawn to walk up, equalize the count, and freeze your progress while the rest of their army maneuvers. A linked pawn cannot be pushed, but it also cannot move without losing its progress, so it is a hostage unless a partner screens it.
A Flag deep on the enemy side of the map is worth more than one near home, precisely because it anchors offensives that your Nexus is too far away to feed. When both hidden tiles reveal on the same flank, the whole game will be fought there. Get there first.
Protect the Flags You Hold
A captured Flag flips back after four rounds of enemy superiority around it, and it flips instantly if the enemy occupies every neighboring hex. So the rule for holding one is the same as the rule for taking one. Keep more pawns near it than they do. One garrison pawn adjacent to the Flag forces the opponent to commit two, and your reinforcement resets their recapture clock the moment it evens the count.
Do not garrison with your whole army, though. The recapture clock is slow, four full rounds, and it resets every time you restore parity. Usually one nearby pawn and one within marching distance is enough insurance, and everything else belongs at the front.
Protect Your Home and Nexus
Nexus defense is cheap right up until it is impossible. The siege needs strict superiority, so a single defender adjacent to your Nexus means the attacker must bring two pawns, and two defenders demand three. Every round in which you match their count resets the entire siege to zero, which makes a timely reinforcement devastating for the attacker. Five committed rounds is an enormous investment to lose to one returning pawn.
The real danger is emptiness. If your entire army is abroad, two enemy pawns beside your Nexus can run the whole siege before anyone walks home. Keep one eye on the walk-back distance of your rearmost pawn, and treat the enemy's quiet moves toward your corner with suspicion. The siege also cannot start while the attackers are unsupplied, so the corridor feeding their assault is a perfectly good place to defend your fortress from.
Corner Your Opponent
A push in the open moves a pawn. A push at the edge of the board removes one. The retreat hex must exist and be empty, so an enemy pawn on the rim, or pinned against a Nexus, a Flag, an objective tile, or any occupied hex, dies to a push it would otherwise survive. Herding enemies toward the rim converts your Strength advantage into permanent material gain.
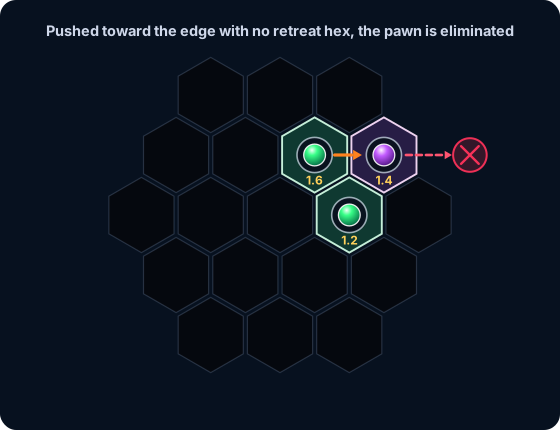
The board helps you see these kills coming. When a push would eliminate rather than displace, the arrow display marks the doomed retreat. Set the trap a move early. Push the enemy toward the rim once, and the follow-up push becomes lethal. Remember also that your own pawns are pieces of the trap, since a retreat hex occupied by anything is a death sentence.
The same instinct applies at army scale. Encirclement flips surrounded territory, and a pawn whose six neighbors are all enemy pawns dies without a push. Against a shrinking, cornered army, patience and a closing ring beat a frontal assault every time.
Spend Strength Like Money
Strength is Dominion's economy, and the exchange rates are printed in the rules. A neutral tile pays 0.10. An enemy tile pays 0.50, five times more. A push costs the defender 0.33 and costs you nothing. Disconnection burns 0.5 per round. Read those numbers together and the doctrine writes itself. Grow on neutral ground early, feed the growth to a small number of pawns rather than spreading it thin, and once the armies touch, take enemy tiles whenever the choice is close.
Feeding one spearhead matters because pushes need one and a half times the defender, not a big army average. A single 2.5 veteran with a 1.0 partner pushes nearly anything, while five pawns of 1.3 each can stall against a compact defense. Give your conquests to the pawn that will lead your attacks, and screen it with the others.
And never spend a pawn's life carelessly. You have five for the entire war. Losing one for nothing does not just cost material, it can collapse the territory it was holding and disconnect its neighbors. Before any risky advance, glance at what happens to the map if that pawn dies.
Training With Our AI
The five levels are tuned as a curriculum. Levels 1 and 2 chase tiles, overextend, and leave corridors hanging, which is exactly what you need while the cut and the wedge are becoming reflexes. Level 3 plays a solid, considered game. Levels 4 and 5 plan deeper, guard their lines, and punish every disconnected pawn, and these top two levels require a free account to play.
After a loss, replay the game in the move history and find the turn your supply line became cuttable, or the pawn that wandered off alone. There is almost always one. Finding it is worth ten ordinary games of practice, and the leaderboard pays more for wins against the higher levels.